| |
|
| Entry #2: The Big Picture |
|
| February 1st, 2008 | Neil Rodrigues |
| |
In the previous entry, we discussed The Silver Lining’s plot. No, we didn't reveal any spoilers, but we did get to show how the script was written, from the ground up. The script is like the lifeblood of the game, in the sense that all other game assets could not really exist without it. However, the script also has its limitations. For example: at first, you might think the words “shiny metal box” are quite descriptive for storyline use, or even narration. But, it’s not until the time comes to actually create the box that you realize crucial details such as size, shape and material, were never specified.
Thankfully, these details are optional. The old saying is true: a picture is worth a thousand words. Meaning, there’s absolutely no need to go overboard with highly-detailed narrative, because you have visuals to do the job for you! And what better way to illustrate this, than to make this month’s entry more visual than descriptive.
In this entry, I’ll be discussing the two processes used to create backgrounds in TSL. First, I'll go over the process of “remaking” sets from previous games, and then we'll explore building sets entirely from scratch. Since background art always makes up the majority of visual content in every scene, you should have no problem understanding why this month’s entry is aptly titled: The Big Picture. |
| |
| |
Remaking a Scene:
Reference Material
Like the storyline, artwork is based on reference material as well. In fact, reference material is mandatory when it comes to remade sets. The script is the primary source of reference, but sometimes words are not enough for an artist. For example, let’s take the scene I briefly described last entry: Isle of the Crown - Docks. Here is its general scene description from Chapter 1 of TSL:
Description: Similar to KQ6, except the ferry is on the other side of the docks, in the water (no longer dry-docked), fully renovated and repainted. There is also a ticket booth and a few waiting benches under a nearby tree. Several pots that used to be filled with flowers are mostly knocked over by the rain, with some flowers lying on the docks or in the water. The ferryman is standing nearby with some of the members of his crew, looking very “professional.” There is also a lighthouse in the distance, to the west. It’s raining.
The description itself is fine, but as an artist, you’d find it quite difficult to sketch the scene from this paragraph alone. Unless you have photographic memory, chances are you’d need some kind of reminder of what KQVI’s docks looked like. This is where the screenshots you took for the References appendix come in handy:
Figure 1: King’s Quest VI: Isle of the Crown - Docks
With both the visual reference and the script in hand, you’re ready to begin the first phase of designing a scene background. |
| |
| |
Black & White Sketch
It all starts with a quick pencil sketch, usually drawn by hand. Why draw by hand when you could just convert the KQVI pic to black & white? Well, you wouldn’t be able to do that because the maximum screen resolution of KQVI was 640x480 - way too small, especially considering the monitors & video card resolutions we have today! The other obvious reason why copying the KQVI picture wouldn’t work is because many changes have been made to this scene in order to fit in with TSL’s storyline. Now that you have no more excuses, grab a pencil and start sketching!

Figure 2: Sketch of The Silver Lining: Isle of the Crown – Docks
|
| |
| |
2D Painted Scenario
The next stage is to add some colour to the sketch. You could do this by hand as well, but usually it is done digitally using a 2D paint program, like Photoshop. The sketch shown above was actually the final one used for the Docks scene in TSL. It’s not unusual to end up with several different variations of artwork for just one scene. This is largely due to interpretational differences of the script, and necessary visual modifications, which might have been previously overlooked. To better illustrate this, here are three painted scenarios of the Docks:


Figures 3, 4 & 5: Painted Scenarios of
The Silver Lining:
Isle of the Crown – Docks
|
| |
| |
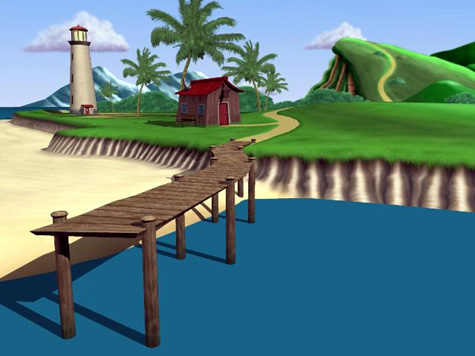
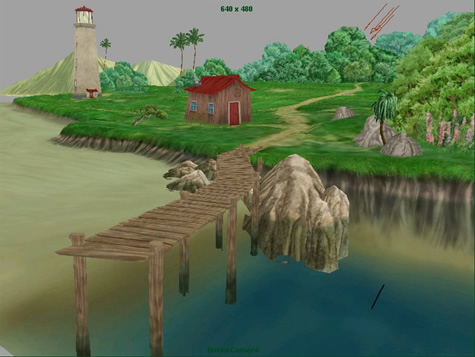
3D Model
With the completed 2D scenario in hand (or not), the next step in creating a scene is building the 3D model. Colour isn’t very crucial in this phase but it is important to have the most up-to-date 2D version of the scene, in order to know how to arrange the scene. In theory, the 3D model should match exactly with its 2D counterpart, but due to perspective/scaling/cameras and other considerations, it is pretty rare for this to happen. However, this is to be expected, because it’s equivalent to sculpting an action figure out of clay, from nothing but a page in a comic book. Here’s a screenshot of the 3D model of this scene, with a couple of characters placed on the ferry as well:

Figure 6: 3D Model of The Silver Lining: Isle of the Crown – Docks
Sometimes pieces of the 2D scenario are grafted onto flat 3D planes, creating the illusion of 3D. We can get away with using this “cheating” technique, because TSL is not a full 3D game. The camera range in most scenes is either fixed or very limited, and as a result, most objects will only be seen from certain camera angles. This allows flat objects to be used in scenes, which save your video card from having to render surfaces that are never even seen. In other words, this boosts game performance, allowing it run faster, even on older systems. You’ll notice in the following screenshot that the hills and mountains are actually re-used from one of the 2D scenarios:

Figure 7: 3D Model of The Silver Lining: Isle of the Crown – Docks
(with 2D stand-ins)
|
| |
| |
Textured Set
Texturing is the stage that turns a solid-coloured sphere into a mountainous globe of the Earth. It’s basically taking the 3D geometric shapes from the modeling stage and giving them realistic-looking surfaces. Here’s where that 2D scenario developed earlier really comes in handy, because texture should ideally match the same 2D hand-painted style, or better. The model starts off with a base texture, and gets more and more detailed with each revision. Finally, shadows and lighting are merged into the texture (also known as being “baked in”). The engine is capable of generating dynamic shadows and lighting, but again, to achieve better game performance, most shading is baked into the set’s texture:

Figures 8, 9 & 10: Textured Sets of The Silver Lining: Isle of the Crown – Docks
|
| |
| |
Exported Set
Finally, we drop the textured set into the engine, by exporting it from Maya format to Torque format. We’ll discuss this process in more detail in a future entry. But basically after all 3D work is done, you'll get a finalized set similar to this:

Figure 11: The Silver Lining: Isle of the Crown – Docks
You’ll notice that this set doesn’t really match any of the three textured sets shown above. This is because a new "stormy" texture was applied, the camera position was fine-tuned and environmental effects (i.e. fog & rain) from the game engine were added. All of these visual effects try to accomplish a simple goal: to make the scene look as good as it sounds in the script. Those of you that have played the TSL Public Demo will recall that the lighthouse beam circulates, trees sway in the wind, and the ferry bobs up and down in the water, as the ocean laps against the shore. |
| |
| |
Creating a Scene from Scratch:
Remaking a scene is all fine and dandy, but what about creating original scenes? The process for creating a scene from scratch is actually exactly the same as remaking a scene, except for the reference material. While it is possible for external images to be used in designing new scenes, usually there is no visual reference for the artist when creating scenes from scratch. You’re forced to rely strictly on the script, and sketch purely from imagination. A good example of a scene built purely from scratch is the Main Hall on Isle of the Beast. Since the process is so similar, I’ll omit the explanation this time, and just visually illustrate the process.
Reference Material
Description: Graham has entered a majestic hall in the castle. To his left, carpeted mahogany stairs lead up to a balcony that encircles the hall, with doors along the back wall. A chandelier hangs from the ceiling and casts dappled light onto the scene. A red carpet edged in gold lies on the floor, and the room is furnished with wooden antiques: a chest that sits against the wall to the right, a large cabinet to the left, a table at the back wall, and pedestals containing vases toward the front of the room, one in each corner, and statues scattered all around. Also on the back wall is another large door that leads to an inner garden. To the right above the chest hangs a beautiful painting. The painting is of a minstrel blowing a golden horn. In the rear right hand corner of the room is an oaken door that leads down into the basement. There are also roses, hanging around everywhere.
Black & White Sketch

Figure 12: Sketch of The Silver Lining: Isle of the Beast – Main Hall
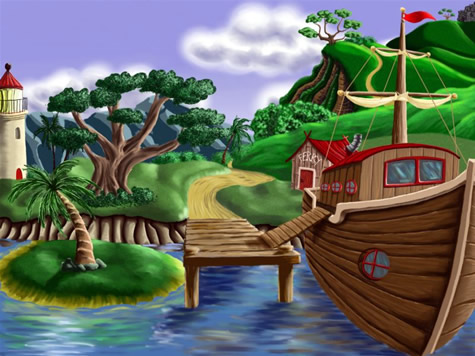
2D Painted Scenarios


Figures 13 & 14: Painted Scenarios of The Silver Lining:
Isle of the Beast – Main Hall
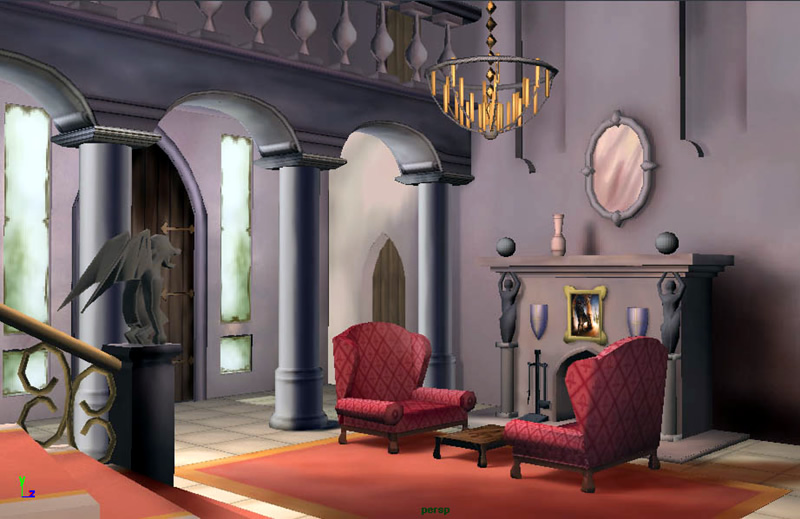
3D Model

Figure 15: 3D Model of The Silver Lining: Isle of the Beast – Main Hall
Textured Set

Figure 16: Textured Set of The Silver Lining: Isle of the Beast – Main Hall
Exported Set
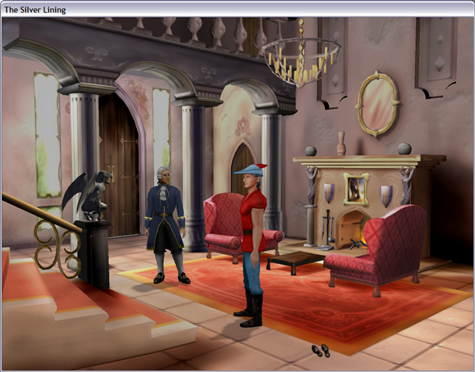
Figure 17: The Silver Lining: Isle of the Beast – Main Hall
|
| |
| |
While this whole process was summarized quaintly for this journal entry, in reality, creating artwork is a very long process. Bringing scenes from black & white sketches to their finalized exported state took years, and involved many artists specialized in many different areas. Surprisingly, this entry only talks about one aspect of art: background design. There’s still another side of art that we haven’t even mentioned yet.
If you found this month’s entry to be a little weak, fear not. Next month’s entry is bound to have a lot more character.
>> Comments |
| |
|
|