| |
|
| Entry #9: Lights! Camera! Action! |
|
| September 1st, 2008 | Neil Rodrigues |
| |
In last month’s entry, we discussed the final phase audio goes through in game development. This month, we’ll talk about the final phase for visuals. Previous journal entries discussed the process of creating individual visual assets (i.e. characters, backgrounds, etc). However, it was not made clear exactly how these pieces all physically fit together. Scripting dictates when and how game elements are sequenced, but they first must be positioned correctly in place.
In The Silver Lining, scripting, sounds, and set design are completed almost simultaneously. Usually the basic set design is done first, followed by basic scripting for that set, and then sounds. The reason why I’ve left this entry for last to discuss, rather than first is because set design is one of the very last things to finalize in the game. The rest of this entry will discuss the pieces involved in building a set. |
| |
| |
Reference Material
The reference material for the set is the 3D file built in Maya. The goal is to make the in-game set look completely identical to the 3D Maya set. This is not too difficult to do, because a Maya-to-Torque exporter is used to have things sized and placed exactly where we want them. As long as the 3D models are prepared properly for export beforehand, they will display and work properly in the game. |
| |
| |
Exporting
One of the major advantages of exporting scene elements as a set is that there’s no need to re-position items within Torque after being exported. Set geometry like: walls, floors, furniture, trees, etc. are all positioned in their correct location in Maya, and all use the same bounding box.
Characters, on the other hand, are exported separately than sets or static scene objects. They too have their own set of guidelines to be followed; otherwise they will not work properly. Discovering all these minor issues and their workarounds comes from experience through trial-and-error.
A good example of this is the bug from the TSL Public Demo where Graham’s hat looked very dark when walking around the Main Hall. The eye and mouth geometry was parented to the character bones instead of being bound to them, which was causing the error in lighting. See the picture below:
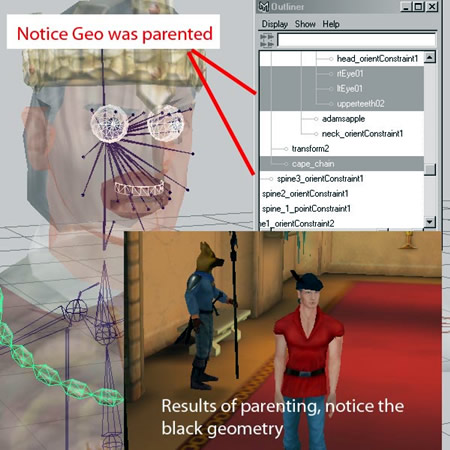
Figure 1: Graham exported with parented eye and teeth nodes
|
| |
| |
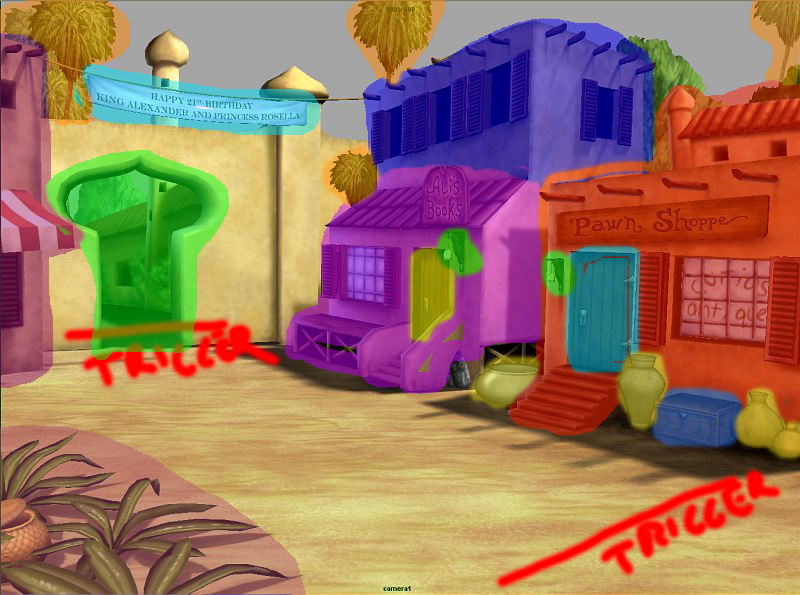
Collision Meshes
A collision mesh is an invisible coating that surrounding objects, set geometry and characters. They are used to identify what object the user has clicked on. Keeping in mind that the game is 3D, when you click a spot on the screen, what you’re really doing is casting a ray from the camera into the scene. This ray continues until it collides with something and stops – a collision mesh. Collision meshes can overlap each other, depending on the camera angle, but the one closest to the camera will be intercepted first (similar to the depth ordering of objects in a 2D game).

Figure 2: Collision Meshes on Isle of the Crown - Village
As shown by the trippy psychedelic colours above in the Isle of the Crown Village, collision meshes are used over top of almost every object within a scene. Generally, each collision mesh has Narrator dialogue associated with it which plays when you click the Eye on it, or the underlying object is something that Graham can somehow interact with another way (such as Hand on PawnShop door). Everything without a mesh (in this case, the ground and walls surrounding the green archway) uses the global scene's collision mesh, which plays the general scene description dialogue. The two areas marked as “Trigger” will be explained next. |
| |
| |
Markers
Markers are used for initial positioning of characters in a scene (i.e. character markers). Walk triggers are a special kind that is used to trigger some event, such as going to the next scene or falling down a trapdoor (i.e. scene change markers).

Figure 3: Scene Change and Event Markers on
Isle of Mists - Druid Village
Markers work in conjunction with collision meshes, in the sense that in order to interact with an object, Graham must first walk up to a certain spot nearby first. The above screenshot shows the walk trigger areas & meshes in Isle of Mists - Druid Village where the scene changes to another. It also shows the many different ways Graham interacts with objects in the scene. The places where Graham is standing are event markers, while spots 6 & 7 are character markers for druids. |
| |
| |
Cameras
Every scene is exported with at least one camera. The basic set always has a default static camera, which has already been positioned in place in Maya. When we first decided on making TSL, we wanted a screen-to-screen adventure game, which essentially means 1 static camera per scene. However, around the time the TSL Public Demo came out, we began experimenting with dynamic/moving cameras and started using them in sequences. These are cameras that follow a preset path of camera markers, producing zooms, sweeps and other dramatic effects. |
| |
|
Figures 4-6: Three Dialogue Cameras on Isle of Mists - Druid Village |
| |
The third type of camera is a dialogue camera. These are close-up camera views used specifically during conversations. They can be static or dynamic, and interchange while each character speaks. Close-up camera views are sometimes used when viewing objects in a scene as well, in order to better show the detail of the artwork.
The last type of camera is a tracking camera. Unlike the other cameras, this camera is not exported from Maya. It is purely defined by code and can only be experienced in-game. This camera is used in select scenes throughout the game, and makes the player feel fully immersed in the game. We added this camera to the Main Hall and Inner Garden scenes within the TSL Beta Tester Build (38.0 MB). Try it out and experience all camera types for yourself! |
| |
| |
Environment
The last part of a set to get defined is the environment. The environment includes everything from the sky (i.e. overcast, daytime, dusk) to sunlight intensity which affects overall lighting as well as shading and shadow direction. Other environmental elements include particle systems, such as fire (i.e. fireplace, candlelight, torches), rain, fog/mist, and bodies of water.

Figure 7: Isle of the Crown - Crossroads showing Lightning Effect
Lightning is another environment-related element. It is a feature built into Torque, just like the other environmental effects. It can be positioned, textured, targeted to hit a marker or collision mesh, and can be scripted to appear on demand yet look random every time. When used in combination with a walk trigger, sound effects, and animation, its effect is enough to make you jump, along with Graham! |
| |
| |
It doesn’t take too much imagination to see how a scene can go back and forth between set design and scripting. Once the 3D assets are in place, scripting tells it how to react to user input. But the reaction itself is entirely dictated by how well the asset was exported, positioned, captured by the camera, and associated with the scene’s environment, along with its neighboring scenes. It’s a constant refinement process to get everything to work together in harmony, and now you know why.
This refinement process of checking assets and ensuring they perform correctly is time-consuming and never-ending, depending on how perfect you want things to be. It’s at this point where a layer of objectivity needs to be introduced, so that an independent observer uninvolved with development can step in and say for certain whether something works as expected or not. Next month, we’ll discuss how well the game passes or fails this test.
>> Comments |
| |
|
|