| |
|
| Entry #6: Start Your Engines! |
|
| June 8th, 2008 | Neil Rodrigues |
| |
Last month’s entry talked about how character voices are created and entered into the game engine. However, the game engine did not originally support this ability. The Silver Lining uses the Torque Game Engine at its core – an engine designed for creating first person shooter games. The engine supported the ability to play sound files, but we needed a system capable of playing sequences of sound files context-sensitive and on-demand, organized by character and scene. We needed a dialogue system.
Dialogue systems exist in every adventure game. They synchronize the text in the script with the voice of a character, but do so in an interactive way that allows the player to choose what to talk about. So, how do you take something that can play one sound file and turn it into a dialogue system? Through the process of software design. This journal entry will explain the design process I used to build an integral software component into the game engine – a component which, in turn, functions much like an engine on its own. |
| |
| |
Reference Material
The dialogue system in TSL could have been inspired from any of the various kinds of dialogue systems used in the past. But, I tried to focus more on the functional aspect of it rather than the visual. My main reference was the script, and the goal was to create something that closely followed the way it was structured, so that it would be simple enough for anyone to use, as opposed to only the person who built it.
I started off with a basic definition of what the dialogue system is. Looking at the script, this was what I came up with:
The Dialogue System allows characters in the game to communicate with each other. Communication is achieved through single-topic or multi-topic conversations between one or more characters.
|
| |
| |
Requirements
The next step is to list everything the dialogue system should do, from both a functional and non-functional perspective. A functional requirement defines a specific feature of the system, while a non-functional requirement specifies how the system should behave. Another way of distinguishing between the two is that a functional requirement says what the system should do, and a non-functional requirement says how it should do these things. Here’s the list of requirements I originally made for the dialogue system:
Functional Requirements:
- single-topic conversations with one character (i.e. Narrator)
- single-topic conversations with two or more NPC characters (i.e. sequences)
- single-topic conversations with user and one NPC character
- single-topic conversations with user and two or more NPC characters
- multi-topic conversations with user and one NPC character
- multi-topic conversations with user and two or more NPC characters
- conversations may be triggered by the Talk, Eye, Hand, Walk, and Item icons on main toolbar and in inventory
- conversations may start automatically (i.e. without user triggering)
- conversation topics can trigger events and can be made visible by events
- dialogue remains visible on the screen for specific amounts of time (by default make it 1-2 seconds for every two words; we’ll change them to use the voice recordings later)
- text speed can be configured to be faster or slower than default
- previously said topics appear in a different menu background colour
- conversations can be logged to a file (i.e. text file or HTML)
Non-functional Requirements:
- user is able to skip through dialogue easily
- user can listen to the same conversation topics as many times as he/she wants, unless the topic disappears
- dialog text should always be completely visible, despite background
- a lengthy monologue can be split into several dialogue boxes if needed
- user can exit conversations easily (i.e. in one or two mouse clicks)
Usually in software projects, requirements are constantly being updated & modified. In our case, the last 3 functional requirements and the last non-functional requirement were never implemented. They may be implemented if time permits, but it’s also fine if they’re not, since they’re not as crucial to the system as the others. |
| |
| |
Design
The requirements are then transformed into visual representation. Each block represents a sub-component, and the lines indicate how they interact with one another. This representation is done in the form of a UML (unified modeling language) diagram. Here is the original UML diagram for the dialogue system:

Figure 1:UML Diagram of Dialogue System
So basically, a Character or an Item triggers a Conversation. The Conversation can be multiTopic or not, and it has an ID and name. It also has a summary that is used for testing. The methods showTopic() and hideTopic() are used when events trigger the displaying of conversation topics. The makeLog() is used for logging a conversation to a file.
ChooseTopic() is used to start the conversation of a particular Topic. A Conversation is made of 1 or more Topics, each having an ID and a name. If the Conversation is multiTopic, the Topic names are listed in a user-selectable format. If a Topic hasSubtopics, they will be appear after the parent topic has been played.
A Topic is comprised of 1 or more Dialogues. Again, the Dialogue has an ID and the actual text spoken by a Character. The length of time that the text is displayed on the screen is indicated in the Dialogue’s duration.
Looking back at this design today, many of the method names shown above were renamed, some removed and some added. As well, more properties like voice filename and topic visibility were added. But, in general, the overall architecture of the dialogue system remains very similar to this design, which was based on the structure of the game script. |
| |
| |
Use-Case Scenarios
The last step documentation-wise is to create use-cases. A use-case is when you take one of the requirements and present a step-by-step way of what the user does and how the system should react. This is very helpful when implementing, because it gives the programmer a sense of ordering as well as inputs and outputs using actual data. Here are three use-cases for the most used features of the dialogue system:
Single-topic conversations with one character (i.e. Narrator):
| User actions |
System responses |
1. Clicks Eye on benches. |
2. Determines dialogue event as: Chap 1, Look at Benches. |
|
3. Narrator dialog window: White benches, some standing and some lying on their sides, are spattered with mud from the last of the fleeing guests and the sudden rain. |
4. Waits ~13 seconds, clicks left mouse button, or presses Enter. |
5. Dialogue window disappears. |
Single-topic conversations with two or more NPC characters (i.e. sequences):
| User actions |
System responses |
1. <starts Chapter 1> |
2. Determines dialogue event as: Chap 1 Intro sequence. |
3. Waits ~2 seconds, clicks left mouse button or presses Enter. |
4. Cassima: What’s wrong with him? |
5. Waits ~4 seconds, clicks left mouse button or presses Enter. |
6. Valanice: That’s what we’re all wondering, my dear. |
7. Waits ~4 seconds, clicks left mouse button or presses Enter. |
8. Edgar: It was evil… it was pure evil. |
9. Waits ~(ceiling(word count/2)), clicks left mouse button or presses Enter. |
... |
|
10. Dialogue window disappears. |
Multi-topic conversations with user and one NPC character:
| User actions |
System responses |
1. Clicks Talk on Oberon. |
2. Determines dialogue event as: Chap 1, Talk to Oberon and Titania |
|
3.
Displays context menu at cursor with topics:
Tragedy (cascading menu)
Come Inside
Goodbye |
4. Clicks left mouse button on Tragedy. |
5.
Displays topics in submenu:
Edgar
Stranger |
6. Clicks left mouse button on Stranger. |
7. Context menu changes to 25% transparency. Graham: Do you know who that stranger might have been? |
8. Waits ~(ceiling(word count/2)), clicks left mouse button or presses Enter. |
... |
|
9. After last Dialogue, context menu transparency is returned to 100% |
10. Clicks on Goodbye or elsewhere in screen area. |
11. Dialogue window and context menu disappears. |
You may be wondering what this “cascading menu” talk is all about. Subtopics were originally intended to appear in a popup menu. This menu would dynamically appear when subtopics exist, and disappear once the subtopics have been explored. |
| |
| |
Prototyping
At this stage, programmers usually have enough information to dive in and start coding, however it’s usually much more efficient to create prototypes first, before starting on the final project. A prototype is a small and quick example of the actual system which has limited or stubbed functionality. Prototypes can actually be made after any of the previous stages, but we chose to start making them after the documentation had been completed. The purpose of having them is to verify that the system is being built correctly.
If certain buttons or the visual interface must change, it is much easier to change them at this stage, rather than after the entire system is built. A good example of this is the cascading menu I mentioned in the previous section. Here is a user interface mockup of the menu, followed by a screenshot from the actual prototype:

Figure 2: Initial Mockup of Dialogue System Topic Menu

Figure 3: Functional Prototype of Dialogue System Topic Menu
The menu shown here was actually removed because while it sounded good in theory, it ended up covering part of the scene and detracted the player from being fully immersed in gameplay. The menu forced the user to constantly look back and forth from the bottom of the screen to where the menu was located. This issue was solved by moving the menu to the bottom of the screen, and merging subtopics with the original list of topics whenever they need to be displayed. |
| |
| |
Implementation
After the prototypes have been deemed acceptable, full implementation on the system can begin. The prototype doesn’t have to be scrapped or separate from the implementation. The implementation is usually based strongly on the prototype. It just has more functionality, better error handling and uses actual data rather than hardcoded or mocked up data.
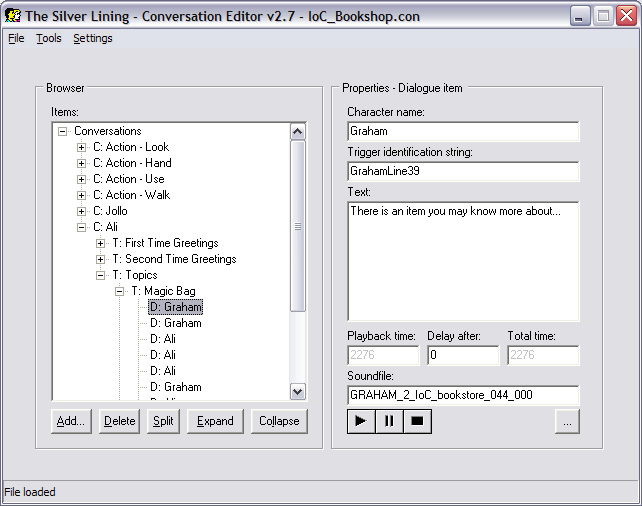
The “data” in this case are separate text files, organized by scene, which tell the engine when to display dialogue, who is saying the dialogue, and what the dialogue actually is. These files also link to the voice files mentioned in last month’s entry. While the game engine reads and processes these files, we needed a simple way to create them to begin with. One of our programmers developed a tool called the Conversation Editor to accomplish this. It provides a visual and easy way to create conversations, topics and dialogues, where the dialogue itself can be copied from the script and pasted directly into this tool. Here is a screenshot of the first prototype, followed by the final version used today:

Figure 4: Initial Prototype of Conversation Editor

Figure 5: Final version of Conversation Editor
You’ll notice in the Conversation Editor that there are several consecutive dialogues for the same character. While at first it looks as if the character is talking to himself, in actuality those dialogues are split from one long dialogue. Each dialogue has its own text and voice file associated with it. They’re also played sequentially without any audio gap between them, so that they sound natural enough that you don’t notice how long the character is babbling on for. |
| |
| |
Testing
To test the dialogue system, several dump methods were created to show how the data was actually being processed by the engine in terms of: conversations, topics and dialogues. The Conversation Editor itself is also able to play the associated *.ogg file defined for any given dialogue, which allows the person inputting the text to easily verify the written script with the voice file. This comes in handy when fixing spelling, grammar or other discrepancies between what is said and what is shown.
As well, a Conversation Tool was built into the engine to provide a more visual way of testing conversations, without having to switch between programs:

Figure 6: Screenshot of Conversation Tool
|
| |
| |
Given everything that goes into making the dialogue system, it’s no wonder one can see it as an engine on its own. Its main purpose is to convert the written script into something the game engine can use when interacting with characters. Not a simple feat, by any means, but hopefully the software design process described in this entry provides you with some understanding in how it’s done.
You’ll also notice that I left out showing any actual code in this entry. This was done intentionally, to show how software should always be designed at a higher and abstract level first. The code itself can be written in any programming language, as long as it follows the design. In TSL’s case, our game engine uses a scripting language called: Torque Script. Next month’s entry will show code written in this language, by showing its usage within the context of a scene. Why can’t the engine just handle all the code itself? For the same reason you can’t effectively direct a screenplay without a script.
>> Comments |
| |
|
|